Table of Contents
Ever find yourself craving something comforting, a little sweet, and surprisingly easy to make? Well, you're in for a treat! Today, we're diving into the delicious world of a puff pastry sweet potato recipe that's about to become your new go-to. Imagine flaky, buttery puff pastry embracing a warm, spiced sweet potato filling, all topped with a luscious maple glaze. This isn't just a recipe; it's a hug in a bite. Forget complicated baking projects; this one is straightforward enough for a weeknight but impressive enough for a weekend brunch. We'll walk you through each step, from whipping up the sweet potato goodness to achieving that perfect golden-brown bake. Get ready to transform simple ingredients into something truly special. Whether it’s a quick breakfast, a delightful brunch addition, or a sweet ending to dinner, these puff pastry sweet potato treats are guaranteed to steal the show. Let's get started!
Making the Sweet Potato Filling for Puff Pastry
Making the Sweet Potato Filling for Puff Pastry
The Sweet Potato Prep
let's talk about the heart of these turnovers: the sweet potato filling. It's not just about throwing some mashed sweet potatoes into pastry; it’s about creating a flavor bomb that complements the buttery puff. First, you'll need about a cup of mashed sweet potatoes. You can roast them for a deeper, caramelized flavor, or boil them if you're short on time. I usually roast mine; it’s like giving them a little spa day before they become the star of the show. Make sure they are super soft before you mash them, it’s no fun having lumps in your filling, trust me.
Once your sweet potatoes are mashed, it's time to get spicy. I like to add a mix of cinnamon, nutmeg, and a pinch of ginger for that warm, cozy feeling. Don’t be shy with the spices; they really bring the sweet potatoes to life. A touch of brown sugar adds a nice molasses-like sweetness that isn’t overpowering. Now, I know some people use white sugar, but brown sugar is the way to go, it adds more depth to it. I also toss in a tiny bit of salt to balance all the sweetness, it makes a huge difference. It's all about layering those flavors to create something truly special.
Spice it Up
Here's a quick guide to my favorite spice blend for the sweet potato filling. I've found that these proportions create the perfect balance of warm, sweet, and slightly spicy notes. Feel free to adjust to your liking, but this is my go-to.
Spice | Amount |
|---|---|
Cinnamon | 1 teaspoon |
Nutmeg | 1/2 teaspoon |
Ginger | 1/4 teaspoon |
Brown Sugar | 2 tablespoons |
Salt | Pinch |
Adding the Marshmallow Magic
Now, for a little twist that’s totally optional but highly recommended: mini marshmallows. Yes, you heard that right. I stir in a handful of mini marshmallows into the filling. As they bake, they get all gooey and melty, creating these pockets of sweet, marshmallowy goodness. It’s like a little surprise inside each bite. If you're not a fan of marshmallows, no worries, it’s just as good without them. But honestly, try it once. It’s a game-changer. Just make sure you stir them in gently, you don’t want them to completely disappear into the mixture before baking.
Assembling Your Puff Pastry Sweet Potato Treats
Assembling Your Puff Pastry Sweet Potato Treats
Prepping the Pastry
Alright, now that your sweet potato filling is smelling amazing, it’s time to bring in the puff pastry. You'll need about two sheets of puff pastry, thawed but still cold. This is crucial, because if it gets too warm, it becomes sticky and difficult to work with. Imagine trying to wrestle a warm, clingy blanket – not fun. So, keep it chilled, and when you're ready, gently unfold one sheet onto a lightly floured surface. Don't stretch it out too much, just enough to make it easier to cut into squares. I usually aim for about 4 to 6 squares per sheet, depending on how big you want your turnovers.
Once your puff pastry is ready, it's time to get cutting! I use a pizza cutter for this, because it's quick and gives you nice, clean edges. You can also use a sharp knife, just make sure not to drag it, use a cut motion, it helps a lot. Aim for even squares, because they'll bake more evenly, this is like a mini puzzle, each piece needs to be the same shape. If your puff pastry is sticking to your surface, don't worry, just add a little more flour. Now, you've got a pile of pastry squares, ready for their delicious filling.
Filling and Sealing
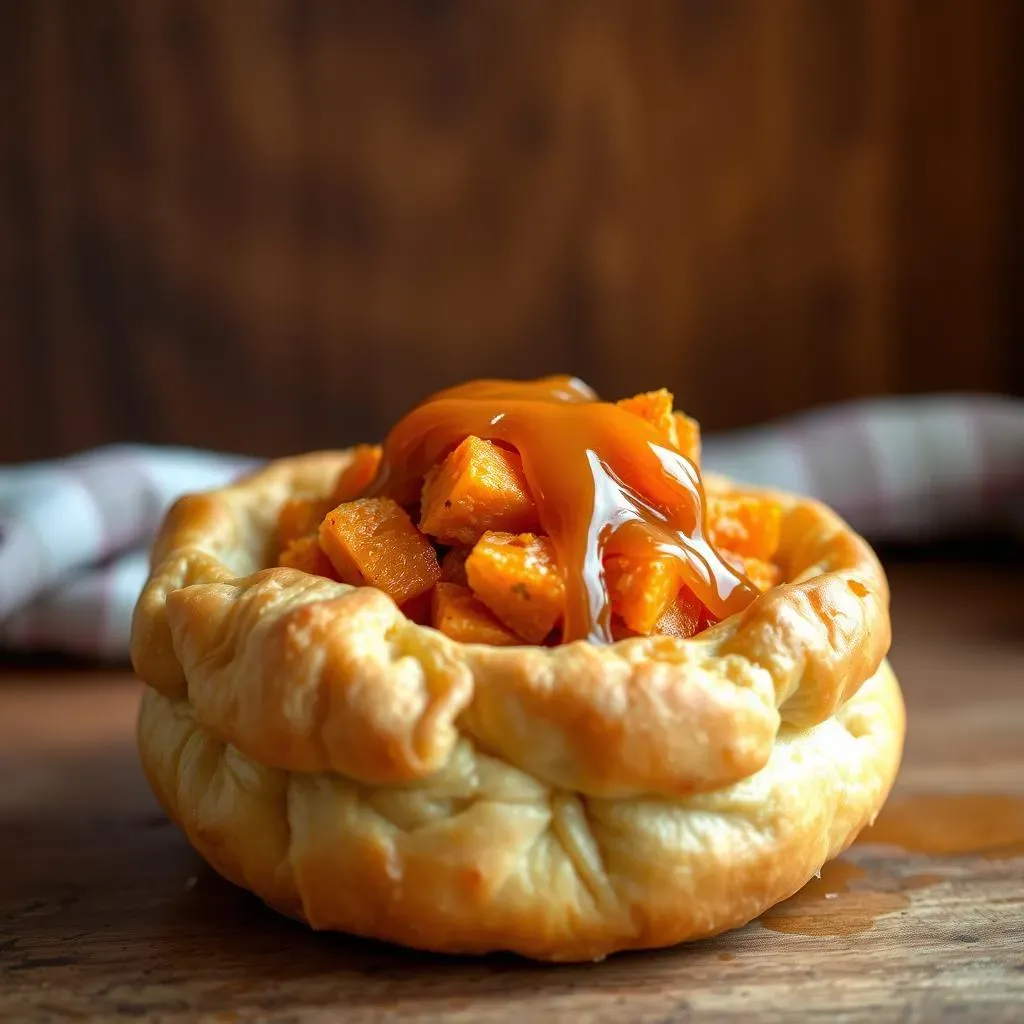
Now comes the fun part: filling each square! Take a spoonful of your sweet potato mixture, and place it in the center of each pastry square. Don’t overfill them; otherwise, the filling will ooze out while baking, it is not a pretty sight. I usually go for about 1-2 tablespoons per square. It's like giving each pastry a little hug of sweet potato goodness, making sure it's cozy and well-filled. If you're adding marshmallows, now's the time to sprinkle a few on top of the sweet potato mix. Now, that the filling is in, it's time to seal them.
To seal them up, fold one corner of the pastry over to meet the opposite corner, creating a triangle. This is where a little water comes in handy. Dip your finger in some water and run it along the edges of the pastry, it acts like a glue. Press down firmly with a fork, sealing the edges, it also gives them a nice decorative touch. Make sure you do it well, so your filling doesn't escape when baking. Repeat this process for all the squares. Your turnovers are ready for the oven, it’s like a little army of sweet treats.
Tips for Perfect Assembly
Before we move on to baking, here are a few tips to make sure your puff pastry sweet potato treats are assembled perfectly:
- Keep the pastry cold: Work quickly to prevent the puff pastry from getting too warm.
- Don't overfill: Too much filling will make them hard to seal, and they may burst open during baking.
- Seal well: Make sure the edges are sealed tightly with water and a fork to prevent leaks.
- Use a sharp cutter: A pizza cutter or a sharp knife will give you clean cuts.
- Even squares: Try to cut the pastry into even squares so they bake evenly.
Baking and Glazing Your Sweet Potato Puff Pastry
Baking and Glazing Your Sweet Potato Puff Pastry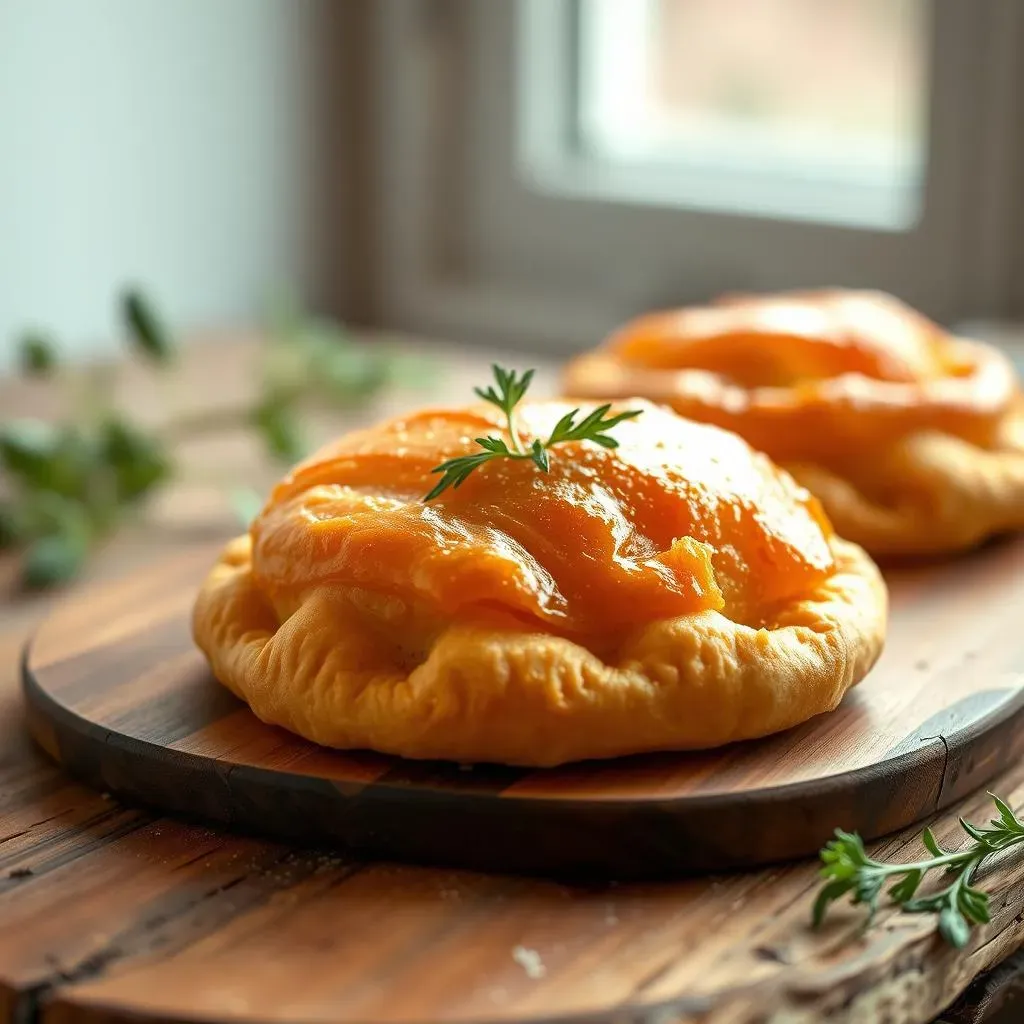
Getting Ready to Bake
Alright, your little puff pastry pockets are all filled and sealed, looking like they're ready for their close-up. Now, it's time to get them into the oven. Preheat your oven to 400°F (200°C). While it's warming up, I like to line a baking sheet with parchment paper; it prevents the turnovers from sticking and makes cleanup a breeze. Place your assembled turnovers on the baking sheet, leaving a little space between each one. You don't want them to bake into one giant pastry blob. If you want that golden brown shine, you can brush the tops with a little egg wash. It's just one egg whisked with a tablespoon of water and it makes all the difference.
Pop them in the preheated oven and let them bake for about 20-25 minutes, or until they're golden brown and puffy. Keep an eye on them, because oven temperatures can vary a bit. You'll know they're done when the pastry is a beautiful golden color and you can see the filling bubbling at the edges. The aroma is going to be absolutely irresistible at this point, trust me. It's like a warm hug for your nose, letting you know that the magic is happening. Once they're done, take them out and let them cool for a few minutes before we add the glaze.
Making the Maple Glaze
While the turnovers are cooling slightly, let's whip up the maple glaze. It's super simple, but it adds this amazing finishing touch. In a small bowl, whisk together 2 tablespoons of pure maple syrup and a tablespoon of milk or cream. If you want a little extra flavor, you can add a tiny splash of vanilla extract or a pinch of cinnamon. I love the warmth that cinnamon brings. Whisk it all together until it's smooth and combined. The glaze should be runny enough to drizzle but not so thin that it just disappears. It's like the final piece of the puzzle, making everything come together perfectly.
Once the turnovers have cooled just a bit, it's time to drizzle on the glaze. You can use a spoon or a fork to lightly drizzle the glaze over each turnover. Don't be shy with it, the more glaze, the better! I like to make sure every part of the pastry gets a little love. The glaze will soak in a bit and create this beautiful, slightly sticky coating that tastes heavenly. Let the glazed turnovers cool a little more, and then they're ready to be enjoyed. The glaze not only adds sweetness but also a beautiful sheen that makes them look absolutely irresistible. It’s the final touch that takes them from good to absolutely amazing.
Glaze Ingredient | Amount |
|---|---|
Maple Syrup | 2 tablespoons |
Milk or Cream | 1 tablespoon |
Vanilla Extract (optional) | 1/4 teaspoon |
Cinnamon (optional) | Pinch |
Serving and Storing Your Puff Pastry Sweet Potato Creations
Serving and Storing Your Puff Pastry Sweet Potato Creations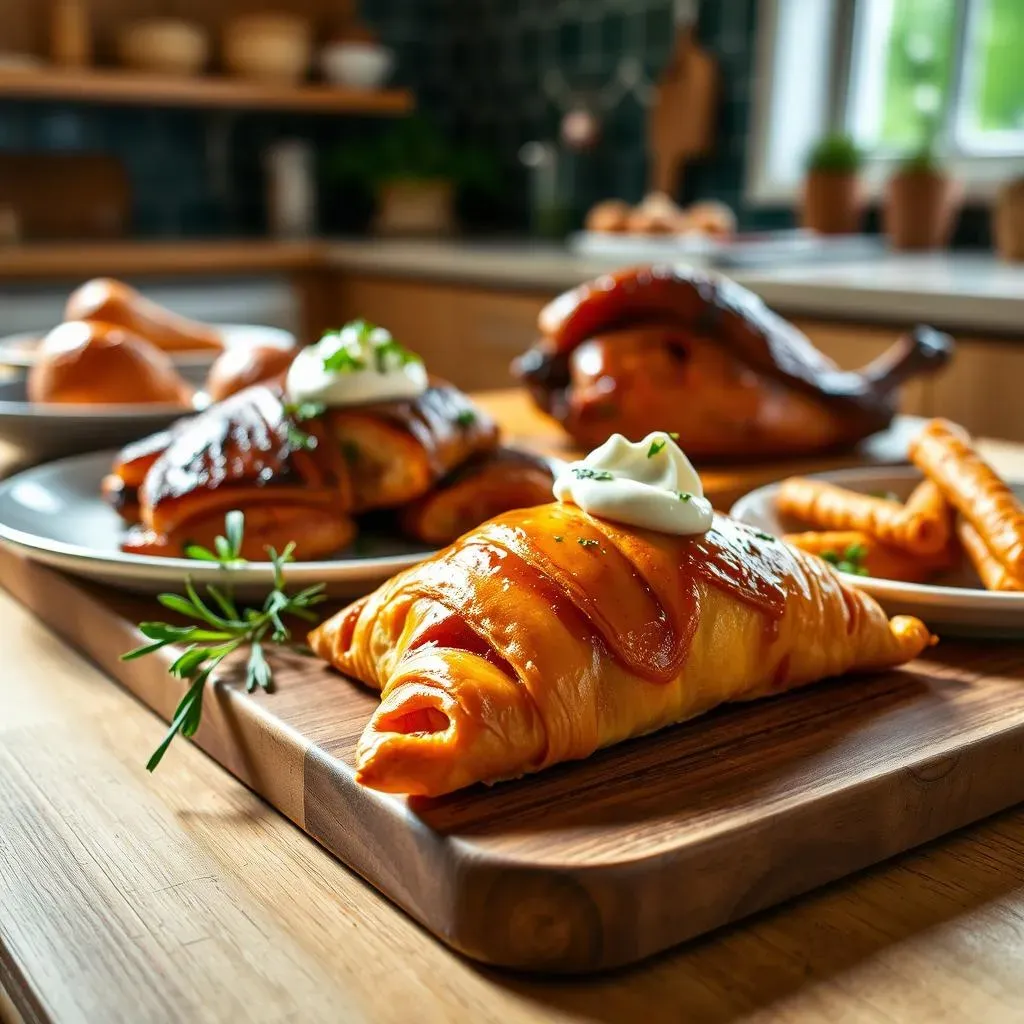
Serving Suggestions
so you've just pulled these golden, glazed beauties out of the oven, and the aroma is driving everyone crazy. Now, how do you serve them? Well, the great thing about these puff pastry sweet potato treats is that they're incredibly versatile. I love to serve them warm, ideally with a cup of hot coffee or tea. It's the perfect way to start a chilly morning or wind down after a long day. They also make a fantastic addition to a brunch spread; imagine these alongside some fresh fruit, yogurt, and maybe a mimosa or two. If you're feeling fancy, a dollop of whipped cream or a scoop of vanilla ice cream on top takes them to a whole other level. Honestly, the options are endless, and they're delicious no matter how you serve them.
But sometimes, you want something a bit more than just a simple sweet treat. These turnovers can also be part of a more elaborate meal. Think about pairing them with a light salad for a balanced lunch or serving them as a side dish with roasted chicken or pork. The sweet and savory combination is surprisingly delightful. For a fun twist, try adding a sprinkle of chopped nuts or a drizzle of caramel sauce just before serving. It's all about making them your own and enjoying every single bite. Don’t be afraid to experiment and find your favorite way to devour these little pockets of goodness.
Storing Your Leftovers
Let's be real, sometimes you make more than you can eat in one sitting, or maybe you're just planning ahead (smart!). The good news is that these puff pastry sweet potato treats store pretty well. If you've glazed them, they're best stored in an airtight container in the fridge for 2-3 days. The pastry might lose a little of its crispness, but they'll still taste amazing. I usually reheat them in the oven for a few minutes to bring back some of that flaky texture; a toaster oven works great for this too. If you're not planning to eat them right away, you can skip the glaze and freeze them for up to 2 months. Just let them cool completely, then wrap them individually in plastic wrap before placing them in a freezer-safe bag. This way, you can pull out just one or two whenever the craving hits.
When you're ready to enjoy your frozen turnovers, you can bake them straight from frozen. Just add a few extra minutes to the baking time, and they’ll be good as new. Once they're warm, you can add the maple glaze and enjoy them again. Remember, if you're going to freeze them, it's best to do it before glazing. This keeps the pastry from getting soggy. Now you have a stash of delicious treats ready for whenever you need a little pick-me-up. It's like having a little bit of sunshine stored in your freezer, ready to brighten up any day.
Here's a quick guide on how to store your puff pastry sweet potato treats:
- Refrigerated (Glazed): Store in an airtight container for 2-3 days.
- Refrigerated (Unglazed): Store in an airtight container for 3-4 days.
- Frozen (Unglazed): Wrap individually and store in a freezer-safe bag for up to 2 months.
Wrapping Up Your Puff Pastry Sweet Potato Adventure
And there you have it – your very own batch of irresistible puff pastry sweet potato treats! From the spiced filling to the flaky crust and that final drizzle of maple glaze, every step is a small victory in deliciousness. These aren't just pastries; they're a testament to how simple ingredients can come together to create something truly special. Whether you're enjoying them warm with a cup of coffee or sharing them with friends, they're sure to bring a smile. Don't hesitate to experiment with your own twist – maybe a dash of cinnamon or a sprinkle of pecans. The kitchen is your playground, so go ahead and have fun. And remember, even if your first attempt isn't perfect, the joy is in the making. So, until next time, happy baking!