Table of Contents
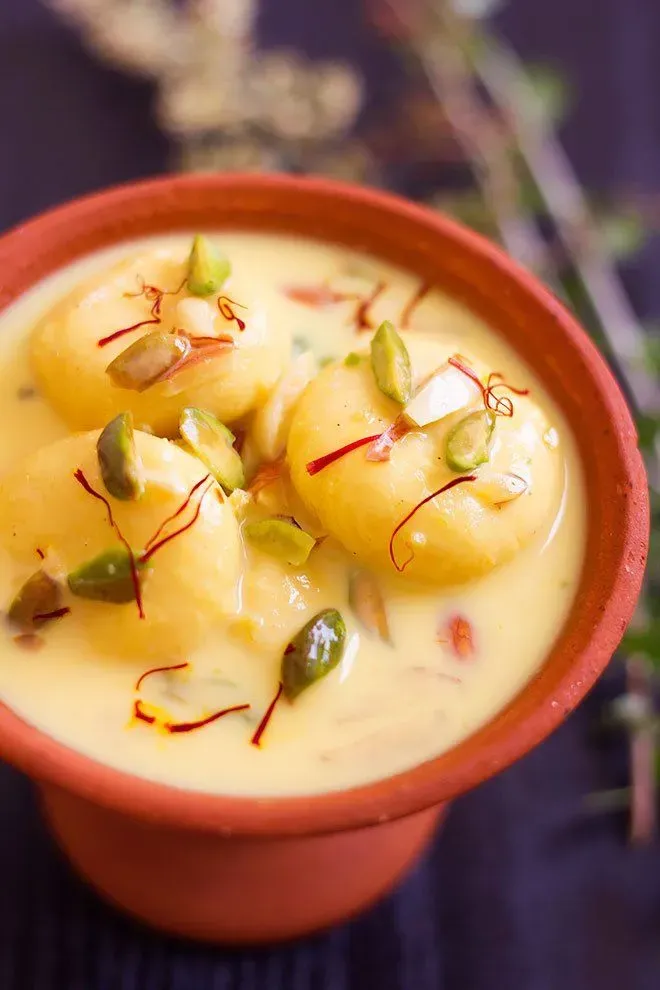
Let's talk about dessert. Not just any dessert, but the kind that makes you close your eyes and sigh contentedly. If you've ever encountered an indian cheese dessert, specifically Rasmalai, you know exactly what I mean. Those soft, pillowy cheese balls, floating in a bath of cool, creamy, cardamom-scented milk? It's less a dessert and more an experience. Forget everything you thought you knew about cheese; this isn't your average cheddar situation. This is dairy elevated to a level of sweet, delicate perfection that frankly, seems a bit unfair to other desserts. Many people eye Rasmalai with a mix of longing and trepidation, assuming it's some ancient, complex craft reserved for grandmothers and professional sweet makers. Turns out, while it requires a bit of patience and knowing a few tricks, making this classic indian cheese dessert at home is entirely within reach. Ready to demystify the magic? We'll walk through each step, from curdling the milk to soaking those glorious cheese discs, so you can whip up this iconic sweet treat yourself. Get ready to impress your taste buds, and maybe a few friends.
Understanding Rasmalai: The Iconic Indian Cheese Dessert
Understanding Rasmalai: The Iconic Indian Cheese Dessert
What Exactly Is This "Cheese Dessert"?
so you've heard the name, maybe seen pictures, but "indian cheese dessert"? It sounds a bit contradictory to Western palates, right? Like, cheese belongs on crackers or pizza, not floating in syrup. But Rasmalai flips that script entirely. It's one of India's most celebrated sweets, originating from the eastern regions, particularly Bengal and Odisha. Think of it less like aged cheddar and more like fresh, milky curds transformed into something ethereal. It’s not savory, it’s not sharp; it’s incredibly soft, spongy, and ready to soak up flavor like a dream.
The Anatomy of Rasmalai
At its core, an indian cheese dessert like Rasmalai is surprisingly simple in concept, though finicky in execution. You start with paneer, which is essentially fresh, non-melting cheese made by curdling milk. This paneer is kneaded until smooth, then shaped into small discs or balls. These little cheese patties take a quick dip and cook in a light sugar syrup, which makes them spongy. The real magic happens when they're transferred to a thick, creamy milk sauce, often flavored with cardamom, saffron, and nuts. It's this soak that transforms the spongy paneer into the melt-in-your-mouth delight everyone raves about.
- Key Components of Rasmalai:
- Fresh Paneer (soft, kneaded cheese)
- Simple Sugar Syrup (for cooking and sponginess)
- Thickened Milk Sauce (flavored and sweetened)
- Flavorings (cardamom, saffron are classic)
- Garnish (nuts like almonds and pistachios)
Why It Captures Hearts (and Stomachs)
People lose their minds over Rasmalai, and honestly, it’s easy to see why. That texture – soft, yielding, yet with a slight chew from the paneer – is unique. Then there's the flavor contrast: the subtle sweetness of the cheese ball itself against the rich, aromatic milk sauce. It’s served chilled, making it incredibly refreshing, especially in warmer climates. Despite its popularity as a festive or special occasion indian cheese dessert, the ingredients are humble. The challenge, and where many home cooks stumble, lies in getting the paneer just right and ensuring the cheese balls don't fall apart during cooking. But nail those steps, and you've got gold.
From Milk to Paneer: Making the Base for Your Indian Cheese Dessert
From Milk to Paneer: Making the Base for Your Indian Cheese Dessert
Starting with the Right Milk
let's get down to brass tacks. The foundation of your perfect indian cheese dessert, Rasmalai, isn't some fancy store-bought ingredient. It's just milk. But not just any milk. You need whole milk, the full-fat stuff. Skim or low-fat milk won't give you the rich curds necessary for that soft, spongy texture we're aiming for. Think of it like building a house – you need a solid base. Using whole milk ensures you get maximum fat content, which translates directly to tender paneer. You'll heat this milk gently, bringing it just to a boil. Don't walk away! Milk boils over faster than you can say "Rasmalai." Once it hits that rolling boil, take it off the heat immediately. This is crucial for getting soft curds, not tough ones.
Curdling and Separating the Curds
Now for the magic trick: turning that hot milk into cheese. You need an acidic agent to curdle the milk. Lemon juice and white vinegar are the most common and easiest to find. Some people swear by citric acid powder mixed with water. Whichever you choose, add it slowly, a tablespoon or two at a time, gently stirring the milk. You'll see the milk start to separate into solid white curds and greenish-yellow liquid whey. Stop adding acid as soon as you see clear separation. Adding too much makes the paneer tough. Let it sit for 5-10 minutes. The curds will settle, making the next step easier. This separation is your first big win in making this indian cheese dessert.
Common Curdling Agents:
- Fresh Lemon Juice (strained)
- White Vinegar
- Citric Acid Powder (dissolved in water)
Draining and Kneading the Paneer
Once the curds have separated, you need to drain them. Line a colander or sieve with cheesecloth or a clean, thin cotton cloth. Carefully pour the contents of the pot into the lined colander. The whey will drain away, leaving the curds in the cloth. Gather the edges of the cloth and gently squeeze out excess water. You want the paneer to be moist, but not soaking wet. Hang it up for 30-60 minutes, or place a weight on it for a similar time, to get rid of more moisture. The real workout comes next: kneading. Take the drained paneer and place it on a clean, flat surface. Knead it with the heel of your palm, pressing and smearing it across the surface. You're breaking down the curds and making it smooth and pliable. Do this for 5-10 minutes, or until the paneer looks smooth and slightly oily. This step is non-negotiable for soft, crack-free Rasmalai balls. If it's crumbly, keep kneading.
Shaping and Cooking: Crafting the Perfect Indian Cheese Dessert Balls
Shaping and Cooking: Crafting the Perfect Indian Cheese Dessert Balls
Getting the Shape Just Right
you've got your perfectly kneaded paneer, smooth and ready. Now comes the slightly fiddly part: shaping. You want to divide the paneer into equal portions. The size is up to you, but remember these little guys are going to expand significantly in the hot syrup. Think golf ball size or slightly smaller if you're aiming for classic Rasmalai discs. Roll each portion gently between your palms, applying just enough pressure to form a smooth ball. The absolute key here is *no cracks*. Even a tiny crack can cause the ball to break apart when it hits the boiling syrup, and nobody wants cheese soup instead of indian cheese dessert. If you see a crack, bring the paneer back together and knead that portion a little more before trying to roll it again. Some people flatten the balls slightly into discs; others keep them round. Either works, just be consistent.
Boiling Up the Sugar Syrup
While you're shaping, get your sugar syrup going. This isn't a thick syrup like for gulab jamun; it's quite thin. You need a wide, deep pot because the cheese balls will swell. Combine sugar and water – a common ratio is 1 cup of sugar to 4-5 cups of water. Bring this to a rolling boil over high heat. You need that vigorous boil when you add the cheese balls; it helps them cook evenly and puff up. Some folks add a pod or two of cardamom or a bay leaf to the syrup for a subtle fragrance, but it's not strictly necessary as the milk sauce carries the main flavor. Ensure the syrup is boiling strongly before you even think about dropping in the paneer shapes. This high heat is crucial for creating the spongy texture in your indian cheese dessert.
Syrup Essentials:
- Wide, deep pot
- Thin sugar-to-water ratio (e.g., 1:4 or 1:5)
- Bring to a rolling boil
- Maintain high heat
- Optional: Add cardamom or bay leaf
Cooking the Cheese Balls to Spongy Perfection
Now for the main event. Gently slide your carefully shaped paneer balls into the vigorously boiling sugar syrup. Don't overcrowd the pot; cook them in batches if necessary so the syrup temperature doesn't drop too much. Pop a lid on the pot. This traps steam and helps the balls cook through and expand. Let them cook for about 10-15 minutes, maintaining that strong boil. You'll notice them swell up, often doubling or even tripling in size. They'll change color slightly, becoming less bright white and more opaque. This cooking process is what makes them spongy and porous, ready to absorb the creamy milk later. Once they're done, you'll carefully remove them from the syrup using a slotted spoon, letting excess syrup drain off before they take their final plunge into the flavored milk bath.
The Creamy Finish: Serving Your Homemade Indian Cheese Dessert
The Creamy Finish: Serving Your Homemade Indian Cheese Dessert
Crafting the Aromatic Milk Bath
your spongy paneer balls are waiting in the wings, fresh out of the sugar syrup. Now it's time for their luxurious soak. This is where the real flavor of this indian cheese dessert comes alive. You need milk again, whole milk, heated gently. Simmer it down a bit to thicken it naturally, or if you're impatient (like me sometimes), a tiny bit of cornflour slurry can help speed things up, but go easy, you don't want pudding. While it's simmering, infuse it with flavor. Cardamom pods, gently bruised, are non-negotiable. Saffron strands add that beautiful golden hue and a subtle, elegant taste. You'll also sweeten this milk, but less sugar than the syrup – the cheese balls carry some sweetness already. Stir it all together, letting those spices perfume the milk.
The Grand Soaking and Chilling
Once your milk sauce is ready and slightly cooled (you don't want it boiling when the cheese balls go in), gently transfer the cooked paneer balls from the sugar syrup into the flavored milk. They should sink down into the creamy goodness. These spongy spheres are now going to act like little flavor sponges, absorbing the milk and all those lovely aromatics. Let them hang out in the milk. The longer they soak, the softer and more flavorful they become. A few hours in the fridge is good, but overnight? That's when the magic really happens. Serving this indian cheese dessert properly means serving it chilled. It's not meant to be warm; the cold temperature enhances the refreshing quality and firms up the cheese just slightly for that perfect bite.
My grandmother always said, "Rasmalai isn't finished until it's had a good nap in the cold." She wasn't wrong.
Garnishing for Glory
Before you serve, give your Rasmalai a final flourish. Finely sliced almonds and pistachios are the classic go-to garnishes. Their slight crunch offers a nice contrast to the soft cheese and creamy milk. A few extra strands of saffron sprinkled on top look beautiful too. Ladle one or two cheese discs into a serving bowl, spoon plenty of that delicious milk sauce over them, and scatter the nuts. Seriously, take a moment to admire your handiwork. You just made one of India's most beloved sweets from scratch. That's something to feel good about.
Serving Checklist:
- Ensure Rasmalai is well chilled.
- Use a spoon to transfer cheese discs to serving bowls.
- Be generous with the creamy milk sauce.
- Garnish with slivered almonds and pistachios.
- Consider a pinch of saffron for color and aroma.
Enjoying Your Homemade Indian Cheese Dessert
So there you have it. You've taken milk, turned it into cheese, shaped it, cooked it, and bathed it in glorious, creamy sweetness. It wasn't a five-minute microwave job, granted, but look at what you've created. This indian cheese dessert, your very own Rasmalai, is proof that sometimes, the best things require a little effort. Chill it down properly – this isn't a warm dessert situation – and serve it cold. Garnish with those almonds and pistachios if you're feeling fancy. The texture, the subtle sweetness, the hint of cardamom – it's all there because you made it happen. Take a bite, and remember that the next time someone asks about making an indian cheese dessert, you can confidently say, "Oh, Rasmalai? Yeah, I make that." And maybe don't share all of it. You earned this.